Sunday, March 1, 2015

First Finished Floor, and done with the windows

Wow, it's March already! I've been away a few weekends, sick for nearly a week, and lacking in enthusiasm for quite a lot of the time since the last post. In spite of it all, progress does continue to happen occasionally. Here's what's been up:

The Windows are done finally!

The task of making the window frames and then fitting them has been a really big job. It's a relief to say that it is done - though I still have to put Osmo sealant on several of them.

 Upstairs end windows.

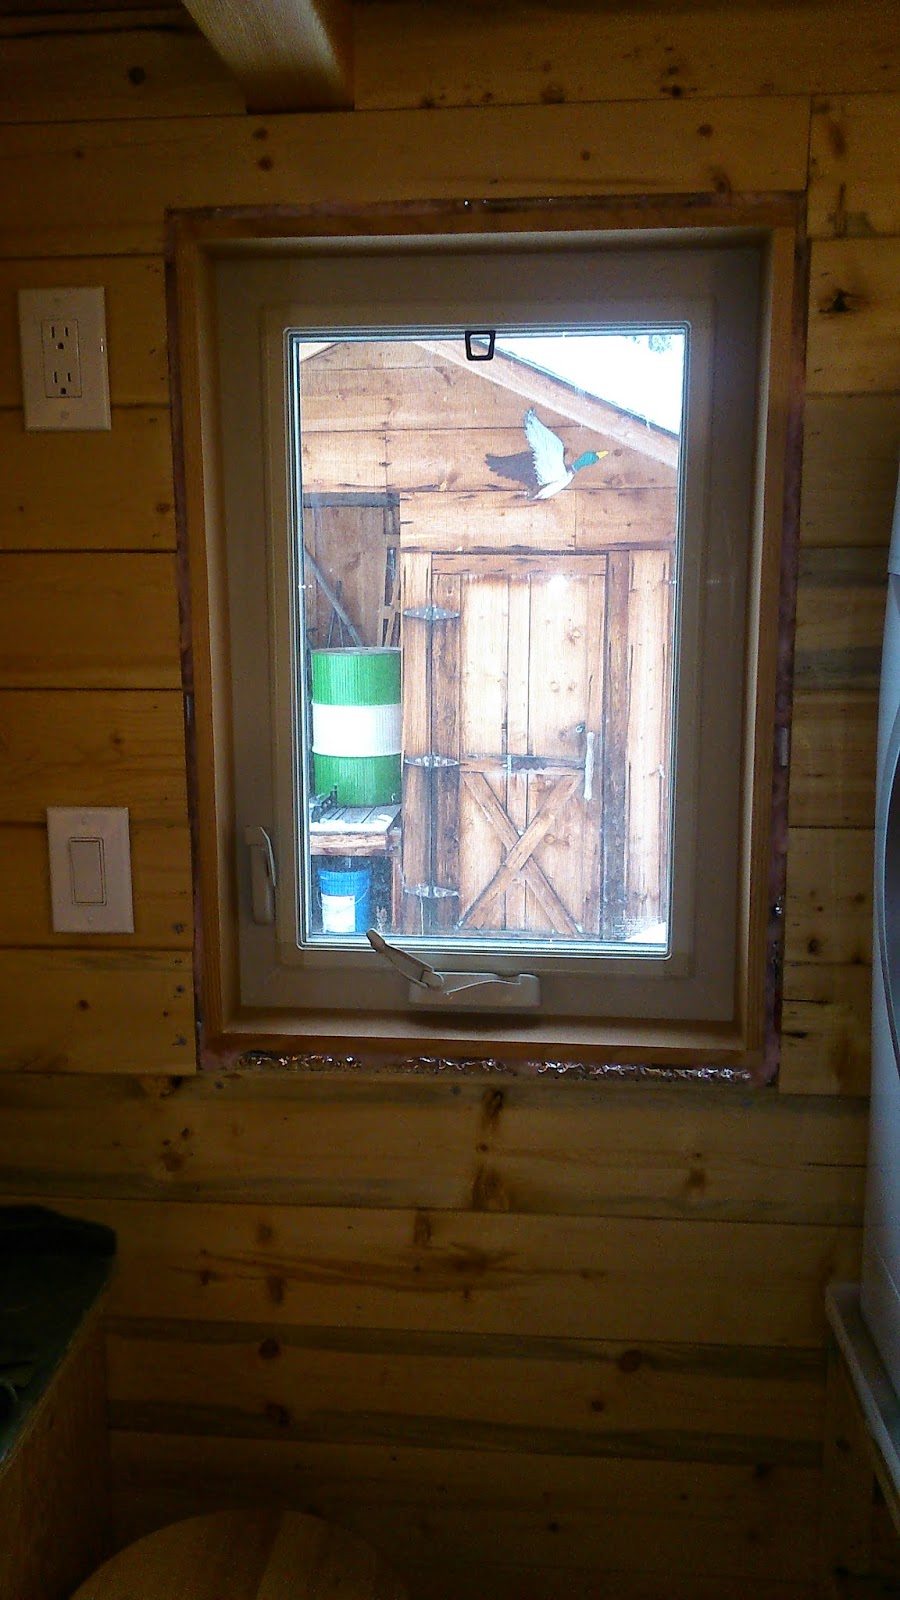
 Bathroom side window, "before" view.

 Due to a variety of issues with differences between planned wall materials and actual wall materials, as well as some initial lack of knowing what I was doing, none of the windows actually turned out to be the same thickness as the walls. Most of the windows were "innies" - a bit thinner than the wall - so I cut a kerf from the outside of the moulding boards to make up for the difference. The bathroom windows, however, were "outies" sticking out beyond the edge of the wall about 3/8 of an inch. The picture above shows strips attached to one side and the ends of the moulding board so that it would cover the window edges correctly.

 Finished bathroom windows.

Cupboard Doors

 Thanks to my father, lower cupboard doors are now in place. There's still a corner door challenge, but it's nice to have these in place.


And the floor in the bedroom loft...

 The first rows of cork flooring going down. It snaps together pretty nicely.

 Front facing view. Looks pretty shiny!


Wow - it looks a lot bigger now!

Working on the media cupboard. This will hold a TV screen/monitor. DVD's or small books can be stored on the left, and there is space for some books underneath. I had a few design challenges with this cupboard in trying to maximize the space for a bigger screen, get the desk high enough off the floor to fit my legs under it, and not take up too much of the window. I'm not sure I hit the best balance, but it will have to do I guess. A 28" screen will fit for sure, 32" is possible, but iffy. 28's enough anyway I guess. I've been talking a lot about getting kids to have less screen time lately - I ought to practice what I preach and not make the screen a big central issue!

The wide shelf acts as a desk - have to sit cross legged, but a useful extra work space. When not in use, it folds up and acts as a cover for the screen so I won't have to look at it all the time. I don't have the magnets attached yet, so it won't stay up to see what it looks like closed. More to come...

Sunday, January 11, 2015

Little Steps

I've been finding these dark winter months to be a bit of a cooling influence on my incentive to build things. The last couple of months have therefore seen progress comparable to the proverbial molasses in January. It is January though, so maybe there is some measure of justification.

In any case, here is what has happened since the last installment:


This is the frame for the refrigerator compartment. The refrigerator that I ordered over six months ago hasn't arrived and I'm afraid may be destined never to do so. It's frustratingly difficult to find a fridge of the size I need, so I'm a bit unsure of what will actually go in this compartment now. It might end up being a bar fridge and some extra storage.

 There's space for a drawer underneath. There is actually a drawer there now, but I don't have a picture of it handy. Anyway, it's a drawer. Use your imagination. :-)

And the fridge compartment is now acting as a handy tool storage shelf. Good thing I don't need to keep veggies cold yet.

 I bought a pine desk at Jysk and modified it to fit the space. Not quite in keeping with my "build everything myself" moto up to this point, but it seems to work reasonably well.

 Looking out from the bathroom. I've had some problems with the stove actually, though it looks pretty rambunctious in this picture. I had the naive impression, when I bought it, that "hey, it's a stove. Hook up the gas and turn it on". Turns out things are a bit more complex than that. I asked the gasfitter who did the gas lines to install it, since he was here anyway. Then it started to go out and not start again, which is rather a problem when the temperature outside is 20 below zero. The company I bought it from didn't want to help very badly because they didn't install it, and the other guys don't know the stove and would probably say it wasn't their fault anyway. A tech was finally sent out with new parts and hopefully it will work now - but it cost almost $500.00 for him to drive out here, spend an hour or so, and leave again. Ouch!  The moral of this story, I think, is that if you buy a gas stove, have it installed by the people you buy it from.

On a happier note, I put an old glider rocker in. It has caused a further reduction in work incentive, however, because it is so relaxing to just sit in it and watch the fire.

Thanks to help from my friend Deirdre, cork flooring has been jigsaw puzzled onto the wheel-well under the desk and bookshelf. There are metal edge plates still to put on the edges though. This is the flooring that will eventually be covering the rest of the floor as well.

Also thanks to Deirdre, rather a large number of things that formerly did not have sealant on them have now been covered with Diamond coat finish (like all of these drawers, inside and out).

Or with Osmo polyx, like this bookshelf.

The last piece of the upper kitchen cabinets is done and installed, and both LED bar lights are in place under the cabinets. One small cabinet door is done. Several others of various sizes aren't.
Also, the crack that appeared in the counter top has been fixed. I was able to fill it with glue and force it closed by setting an anvil on it. When the glue dried Deirdre sanded it down and then put another coat of Osmo on the whole counter top. Deirdre doesn't come often, but she sure gets stuff done when she does!

Also, I've been working on door and window mouldings. As with everything, it's rather slow since I'm making all of the molding boards from scratch. Of course, neither the door nor any of the windows are actually flush with the walls, so I have to cut kerfs in the back of the boards to adjust for the different levels. The door turned out pretty well though. Now I need to paint it something other than white...

Incipient moulding boards for the windows.

Finished mouldings
 More mouldings...
Snowing outside, but moulding boards inside!

 Yep, it's January!


Sunday, November 16, 2014

Stiff Susan and Start of the Pantry Cupboard

I thought I'd already posted pictures of these two little projects, but on looking back, apparently I haven't. It's a good thing I do this blog - it helps me feel like I'm accomplishing things a bit more. In any case, two other projects are:

The Lazy Susan
The lazy Susan is rather stiff to turn, so as suggested in the title of this post, it may have to be called "stiff Susan" or maybe "Susan working hard". However, it's in and it does turn, so that's a good thing at least.


The Pantry
I've just got the frame up for the pantry and have to make drawer shelves for it, but at least the space is defined now.

 The 2 x 2 frame for the pantry

 Plywood on one side of the wall.

Looking down from the top at a stool sitting in the bottom. There's quite a bit of storage space actually.

So that's it - I'm up to date.

There's a bit of snow drifting down in sparkling flakes and the sun looks a bit more cheery than this picture would suggest. Happy Sunday!  :-)

Saturday, November 15, 2014

More Siding and Other Things

All of the siding boards have now been sanded and painted and quite a few more have been put up. Thank you very much to my mother and father and to Deirdre for spending a couple of days working on this!

Just a couple of angle cuts to go and the front will be finished.

Working up the other long side.


Nearly finished - just the slow and time consuming part cutting around the vents and along the top still to go.

The Ladder
 It seems that the ladder ought to look more impressive as it took quite a long time to make. Part of the issue was finding a drill bit to fit the doweling exactly, and then getting the holes drilled correctly. The doweling is 1.5 inch, so one would think that a 1.5 inch drill bit would work quite nicely. The first two bits were too big however, but the third was just right. They all said they were 1.5 inches, so go figure...  ??

It's a fairly simple design though. I cut two 2 x 4's down to make them 2 x 3's, then drilled 1.5 inch holes for the dowel using the drill press. Quite a lot of sanding, gluing and finishing later, I had a ladder. I extended the ladder above the level of the floor so that there is something to hold on to when stepping on and off. After a few trials, this still seems like it was quite a good idea.

Insulation under the floor
Preparation for this was actually quite time consuming. I had to make boxes to cover sensitive parts, as noted in the last post. I also had to cover all of the gas lines with tin to keep them somewhat separate from the foam, and make boxes around any joints in the lines so that they could still be reached and checked for leaks.

 You can see the gas line with its little tin roof running down the center here, and the foam insulation now blown in. It's nice to have this done!

More foam-scape.

Under cupboard light

 This wasn't a big job, but required attaching the light, connecting the wires, and putting a plug on the other end of the wire. I ran wires through the wall in preparation for this light and another that will go on the other side of the sink. The wires go to a plug under the sink and the plug is connected to the wall switch here. The light in the picture is an LED bar light that can direct wire to a regular AC plug.


I also cut, sanded and finished molding boards to go along the bottom of the cupboard. LED lights tend to be rather bright and these boards hide the light fixture and shield the eyes from the direct glare of the light. I don't have the wire stapled out of the way yet though, so it looks a little bit messy hanging down.

Issues with cold and freezing pipes
I made a mistake when I put in the water line from the fresh water tank to the rest of the system. The line runs along the wall, behind the tub, and over to the bathroom sink. This seemed like a good idea at the time, but it turns out that the back corner of the tub is a rather cold place. This is not helped by the fact that the under the floor foam guy missed a spot about one foot square exactly in this corner. In any case, the line froze the first time it went to -20 C and insisted on continuing to do so unless I blew heat around the tub with a heater and fan.

This obviously is not something I want to do all the time, so now I have to move the pipe.

Here's the beginning of the pipe changing process - a large hole in the inside of the bathroom sink cabinet through the two layers between the sink and the tub. Sigh... I guess it gives better ventilation at least.

Here's the pipe on its new path around the warmer side of the tub.

And here's a new T in the line with a valve and a pipe through the floor. This makes it easier to drain water from the lines. It's a bit of a pain taking up space on the floor as it does, but it will still be inside the closet at least.

A Few More Projects...

I have been finding lately that I don't work well with small amounts of time - at least not when it comes to projects that require tools, planning, and materials. The cold doesn't help very much either as it seems to add complications to everything. It generally seems to take half the time for any given project to get set up for it, one third of the time to clean up again, and whatever is left between the two often goes to trying to remember just exactly where I left off last time.

Anyway, now that I've done my wincing and wining about the difficulties of it all, here are some things that have actually been accomplished over the past month or so:

The Fresh Water Tank


I had originally thought I would put the water tank flat on the floor, but decide to stand it on edge instead. I still need to cut plywood to cover the top and front, but the support frame is built and all of the pipes are installed. This tank holds 54 gallons and is good for a backup water supply.

I decided to use a small RV style pump. This one runs on AC power. This picture also shows the pipe going out for a hose connection outside.

 This picture shows the fill pipe coming in from above and the air outlet and overflow pipe going out through the wall in the middle. Sure lots of holes in the wall!

 Yet another hole - this one in the floor for the drain pipe for the tank.

Here's the outside view of the fill spout, air and overflow pipe (it will be cut off shorter), and the hose connection and valve.

Hot Water Heater
The hot water heater has been installed for a while, but the gas lines are in now and it is fully functional.
 Here's a look at the inside. It was jostled around rather roughly in transport and the spark probe was slightly out of position. Tech support at the Precision Temp headquarters was very helpful though and now it's working very well.

Cold weather is an issue for RV style hot water heaters. This one is less affected than any others that I looked at, but it still does get cold inside because of the air intake and exhaust outlet, both of which go trough the floor. It turns itself on briefly when it gets down to a certain temperature. This is great as long as there is gas and electricity. It could be a problem if the power goes out for too long though.
 Here's the view from the front, with the cover on. I haven't had an opportunity to try it for any length of time, but it does put out hot water and seems to react quickly when the water is turned on.

Side view showing the gas lines coming in, and the AC/DC converter to power the heater's electronics.

This is what it looks like under the floor. I made a tin box to go around the air intake and used a larger pipe to provide space around the exhaust pipe. This is so that the space stays open and clear when the foam insulation is blown in.


I had to make several other tin boxes to cover and protect various things under the floor in preparation for the insulation. Here are the flat pieces of tin ready to fold.
...and here's the box with it's bottom lid. This is filled with fiberglass insulation and goes around the trap in the drain under the bathtub. I may have to use a heat tape on the trap as well. It's the place that seems most susceptible to problems from freezing, unfortunately.